11 March 2019

Super easy facings for tunics

Super easy facings for tunics
March 10, 2019

Start with a grid-marked quilting template, 12 inches by 18 inches.

Find your favorite neck-hole; if you've been making garb for a while, you might have one of these in your sewing kit. If you don't you can just copy mine based on the measurements. This is a good size for my partner with an 18 1/2 inch collar size; and for me wearing a women's size 22 plus.


The hole is your STITCHING LINE, not your cutting line. If you have a favorite neck hole, trace it and add seam allowance. Note that the hole is located 4.5 inches down from the top edge, and the shoulder line is offset by about an inch front-to-back.

NOTE: If you're confused about why the neck isn't centered, lay out a t-shirt. You'll see more of the hole is in front of the shoulder seam, instead of being equal front-to-back.

I've cut narrow slits in my template where I mark out shoulder seams, plus center front and center back. You can spot the slit right below the label "shoulder line". Trace the marks with chalk or slivers of soap (I like soap because it washes out, but doesn't brush off as fast during sewing).

I cut my facings at 12" x 18".  If you want a keyhole facing instead, you can add 2.5 inches from the edge of the circle and down the slit.


On the garment, sew your shoulder seam together, but don't sew the rest of the body together yet. It's much easier to do this when it's flat. Iron and finish your shoulder seam. (Practice making these facings with a few scrap pieces of fabric first. Sew two pieces together to make an imaginary shoulder seam, and then sew a practice facing to it.)

Carefully line up the shoulder seams to your chalk marks, and make sure to center the facing left to right. If you put it on the right side of your fabric, it will not be seen when you're finished.

Pay extra attention that the center slit is straight on the grain of the body-side of the garment. Sometimes I pin right down the line to see if it looks straight when I flip it over, then go back and pin across.

USE YOUR PINS.

Stitch on the circle. At the center front slit, stitch an eighth of an inch away from the line. Turn and make two right angles at the bottom, not a V.

Does your circle look wonky?  Does your neck slit look straight on the other side of your sewing? You can fix it now, before you cut your fabric. That's what makes this super easy, because you're not sewing two curved and cut edges to each other. You're sewing two flat pieces of fabric together.


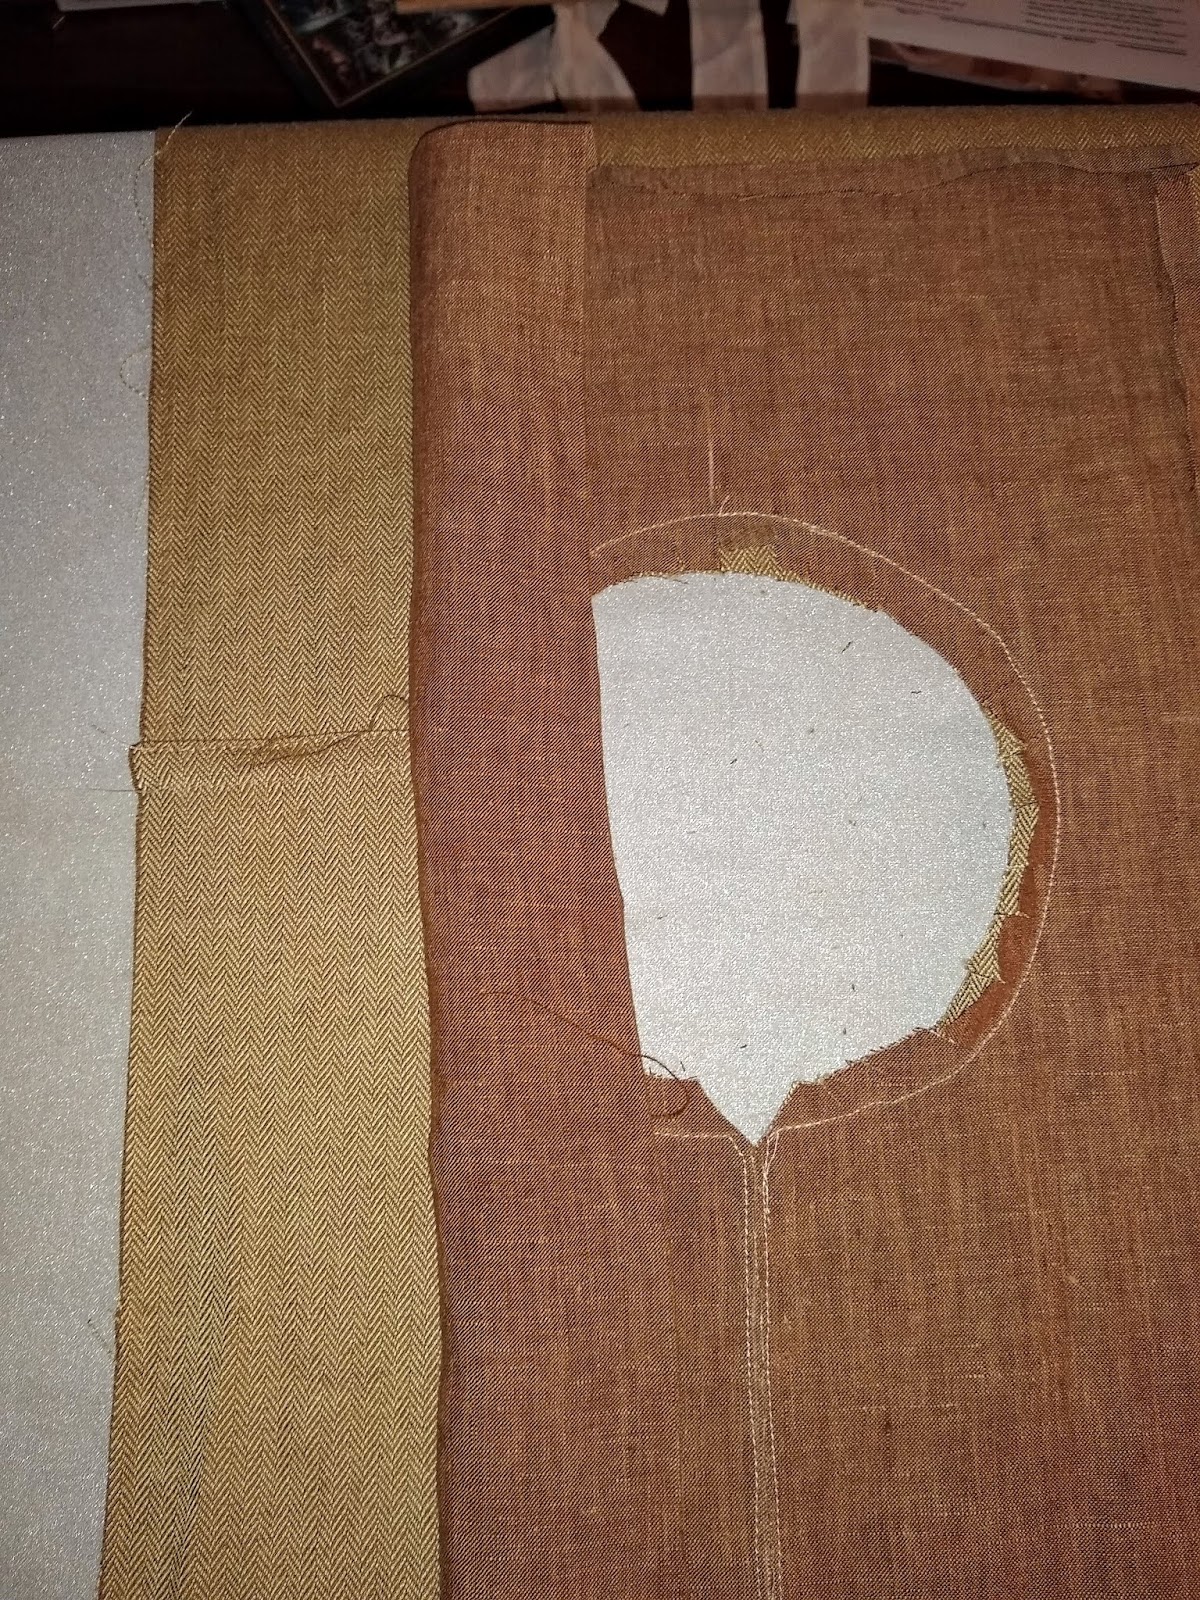
Cut the neck out, leaving a seam allowance. You can see that my edges along the rectangle are already turned on my facing. Sewing the facing and garment right-sides-together puts your facing on the inside of the garment (hidden).


Cut the center slit. In the corners at the bottom, cut into each corner, but don't cut through the thread.


Cut notches across the corners. Clip into the seam allowance around the circle, but don't cut the thread.

Start turning the facing towards the middle

Tuck all the parts through, turning out the corners carefully. In this example, the camel-colored wool is the right side of the fabric, and the facing won't be seen. If you want to know why the body panel is so narrow, check out my pattern for general 11th century tunics across Europe and the Middle East.
It's linked from the front page at idlelion.net.

Flipped through so the seams are all on the inside.

Ironed to within an inch of its life. I'm an advocate that pressing your seams while you sew is what makes your clothes looks neat and well-made. Turn off the steam while you're doing this. You can still blast the steam with the button when you want it, but you're less likely to burn your fingers doing the futsy stuff if your steam is off.

This facing will be stitched around the edges by hand so it's not visible when it's done. In this case I'm adding a linen facing to a wool tunic.

14 August 2015

1066 in Japan- a very brief overview

Getting started with Heian period Japanese garb (794-1185)
Aka: 1066 in Japan- A very brief overview
Julia May, with inspiration from Kay Marszalek

Let me start with the basics: I am not a scholar in Japanese material culture. Our Prince has a Japanese persona. While we, of course, assume our King and Queen will have a long and distinguished reign, some folks wanted to get Japanese garb together—just in case! (tongue-in-cheek).

Baroness Khadijah offered to teach an introductory class on Japanese garb. The material she has available to share is in paper format, instead of electronic. After attending her class, I have tried to reconstruct some of that great knowledge with web-based information. My goal is offer a “starter package” which honors the culture and people whom we are recreating but does not get into finer, and important, details. I welcome comments which contribute resources for the finer details.

What we readily know about clothing in this period is that there are few illustrations of it. The armchair researcher will be surprised, delighted, and frustrated that uncredited line drawings from one manuscript are used by many of the sources out there. 

http://www.iz2.or.jp/english/fukusyoku/wayou/index.htm
The site “The Rebirth of the Tale of Genji: The Costume Museum” appears to be quite popular, and one can easily see why. Clothing of court persons, both men and women, are depicted in color re-creations, as well as line drawings which are labeled with the names of individual garments. Clicking on the fuzzy “Explanation” button yields fantastic garment-ese translations. Unfortunately, the site has not been maintained in the last several years, and links are starting to break.

http://www.fibers.destinyslobster.com/Japanese/Clothes/japoutfits.htm
“Anne Liese’s Fibers and Stuff” offers a breakdown of the types of clothing worn by individuals of different ranks. Some of it appears to be borrowed from “The Costume Museum”, but there are other images available as well.

http://www.sengokudaimyo.com/garb/index.html
“Yusoku Kojiysu Ron: A History of Japanese Clothing and Accessories” is a difficult site to enter. From the link above, click on the upper brown box in the center of the page. This should bring you to a framed website which is difficult to copy links from. It has greater detail about men’s clothing (women’s has not been fleshed out) and an excellent color chart. Clicking on “Kasane No Irome” provides Western dates for the Japanese seasons. The seasons would dictate appropriate colors to wear.

https://www.facebook.com/media/set/?set=a.758943530868387.1073741924.122744754488271&type=3

https://www.facebook.com/media/set/?set=a.800256613403745.1073741936.122744754488271&type=3

https://www.facebook.com/media/set/?set=a.794837213945685.1073741932.122744754488271&type=3&hc_location=ufi
The Facebook page Kyoto Fan has posted a rich collection of public photographs from recreations of three Heian period ceremonies, including some layers of dressing.


As for making the clothing, a few websites are available with cutting and construction plans. SCA participants will recognize similarity with Western panel and gore construction.

Pants http://fibers.destinyslobster.com/Japanese/Clothes/japmakewomenshakama.htm
http://mistress-of-disguise.blogspot.com/2011/12/how-to-make-heian-era-formal-court.html
http://www.fibers.destinyslobster.com/Japanese/Clothes/japmakemenshakama.htm

Robes. Robes are special because each layer is cut slightly different from the last, so that the edges of each layer are visible. This appears to be quite an involved process which likely would take a pair of people several weekends to complete for/with each other. This site “The Kosode: a Japanese garment for the SCA period” by Lisa A. Joseph has many documented resources, references, and explanations of choices made.http://www.wodefordhall.com/kosode.htm

http://www.wodefordhall.com/
This site by Lisa A Joseph is considered a go-to for serious garb research. I found that as I "wandered" through the other sites I could start to get a feel for the garb. This site ties it all together, and provides details which help you see things you didn't know you should look for on other sites.

Joseph also has a gallery of SCA folks’ modern reconstructions of Japanese garb in period. http://www.wodefordhall.com/samurai.htm

08 July 2015

Tunic for an Elevation in the Norse Style: Material Culture 30: A&S50 Challenge

Tunic for an Elevation in the Norse Style: Material Culture 30: A&S50 Challenge
Orchestrated by Baroness Samia
Completed by Dame Marwen's Super Team
Julia May


At Twelfth Night 2015, Baron Viði was placed on vigil for the Order of the Pelican. His wife, Dame Marwen, began coordinating efforts for his sitting in state, and the ceremony of his elevation. Many efforts were abuzzz, headed by many able people. Several additional sets of hands were made available to assist on these projects.

We began with the image of King Cnut, in the lower right corner. 
King Cnut and Queen Emma presenting a cross to the altar of New Minster, Winchester, Stowe 944, f. 6. British Library, London. See more at: http://britishlibrary.typepad.co.uk/digitisedmanuscripts/2011/06/the-new-minster-liber-vitae.html#sthash.uat0Bdzq.dpuf

And used a tunic pattern which Viði found to be comfortable already. This style is one of my favorites because it is well suited to luxury-sized people. The center panel is not as wide as the shoulders, therefore it's not slumping down the arm as though the wearer is "dressed in dad's clothes". It also allows for a better fit around the upper torso, providing greater ease of movement (as a side note, this same pattern appears in the Middle East during this same time period). Many times the tunics are seen with sleeves too long for the arm and ruched at the wrist. Viði's preference was a tunic with standard-length sleeves for his comfort.
Norse tunic pattern. http://simbelmyne.us/sca/court/norse-tunic-pattern.htm

We used a silk-wool twill for the body of the garment. Mistress Cassandra provided the brocade for the facing, and we selected two silk taffeta fabrics to use as the accents. Finally, blue silk Trebizond, garnets, and pearls were used for details.

Vidi heralded by Lady Ejya who composed a Norse poem to celebration the occasion, and flanked by the archery community. He is wearing a belt made by Dame Marwen, Norse pants made by Lord Njall, and shoes made by Master Hrodir.
The shape of the facing and the additional adornment was informed by the 11th century manuscript "'The Arundel Psalter". British Library, Ms Arundel 155, Fol. 93r. Detail.

http://www.bl.uk/catalogues/illuminatedmanuscripts/ILLUMIN.ASP?Size=mid&IllID=5


In all, many hands were utilized in completing this outfit. Baroness Amalia, Baroness Ellen, Duchess Anne, Honorable Lady Una, Lady Ulricka, Mistress Gunnora, Lord Njall, Maaster Hrodir, Dame Marwen, Dame Siobhan, Mistress Cassandra, Baroness Eruiaut, Baroness Ekatrina, Countess Guinevere, and more.

Painted tent flange in a Middle Eastern style: Material Culture 29: A&S50 Challenge

Painted tent flange in a Middle Eastern style: Material Culture 29: A&S50 Challenge
Julia May

Several years ago, my husband and I made a canvas tent for camping. This year I took the opportunity of some extra free time to paint the flange of it.
Photo by Cynthia Bergman

I was inspired by images of camp from the manuscripts of the Maqamat al-Hariri. This is a secular collection of tales about rouge as he move through life. Many of the manuscripts are heavily illuminated. Several come to us from the thirteenth century[1].

St Petersburg Inst of Oriental Manuscripts Ms C-23 fol.43b. An old man and a young man in front of the tents of the rich pilgrims, from 'The Maqamat'. Dated to c. 1200-1250.

Seeing the two tents which are white with blue adornment (our tent is made of white Sunforger canvas, which should generally be left white to maintain the great properties), I decided to paint a "negative" image of white lettering on a blue background like the tent on the left.


A Qur’anic verse carved using the Kufic script, from the Mosque of Sultan Hasan, Cairo, Egypt. From https://starsinsymmetry.wordpress.com/2013/08/05/history-the-kufic-script/

I am not a skilled calligrapher. My husband and I found a font that was similar to the Fatimid Kufic script on this Mamluk-era mosque. We scaled it to fill an 8 1/2 x 11 sheet of paper, and added a grid behind it at the height we needed for the height of the fabric. I used a plastic sheet made for quilting templates to create a frame for scaling the image. I then altered the font we found with elements I could discern from the hand used to decorate the mosque.


Instead of the traditional Fatimid prayer inscription, "Health, Blessings, and Prosperity", we used the prayer, "Health, Blessings, and Safe Weather." A friend provided the translation for me.


[1]Bolshakov, O.G. "The St. Petersburg Manuscript of the Maqamat by al-Hariri and its Place in the History of Arab Painting". Manuscript Orientalia: International Journal for Oriental Manuscript Research, Vol. 3 No. 4 (December 1997): 59-66

07 July 2015

New Stone Settings for a Baronial Coronet: Material Culture 32: A&S50 Challenge

New Stone Settings for a Baronial Coronet
Material Culture 32: A&S50 Challenge
Julia May

Baroness Anplica was given a wonderful gift from her friend, Baron Lyulf. With the help of Baron Frederick, Lyulf made her a baronial coronet when she became a Baroness of the Court. Using nickel-plated stainless steel, it flared nicely, and fit her perfectly. He knew that he did not yet possess the skills to set the six hand-cut lapis stones that she used for pearls, so he thoughtfully glued them into place with an adhesive which would be easy for a future artist to remove. The stones were displayed, and the piece could easily be updated at a later time.


Some time later, Anplica took it to a local jeweler who could make settings for the stones. They bid it at $65 per setting, a very reasonable price for the amount of work it would take, but outside of Anplica's budget at the time. She turned to her newly-minted silversmith friend for a second opinion. I let her know that the local jeweler was offering a reasonable price, and the final product would likely be more professional than I could produce. However, I would take it as an opportunity to learn new skills if she would buy the materials. She was sold.


I used rubber cement to apply copier paper to one side of the silver sheet, then traced around each of the stones. Rubber cement stays in place while the silver is being sawn, and the paper retains the ink better than the silver does.


The bezel wire is cut to shape for each stone. Since they're hand-cut stones they are slightly irregular and each needed to be custom fit. Once the bezel wire is soldered and tested against the shape of the stone a final time, it is soldered to the back plate.

Once the bezel is soldered into place, I carefully cut away the excess back plate, I also determined that I could save weight if I cut a hole in the back of each setting. Then the piece is filed and polished.

Here are four stones in different steps of the process. The last one is not yet set into the bezel, the bezel must first be attached to the coronet.

The bezels were riveted into place. I drilled holes in the top and bottom of the back plate of each bezel. Then I lined them up with the coroner and drilled corresponding holes in each location. I used silver wire in the same diameter as the holes to make rivets which were flared by hammering.  Once all of the bezels were in place, I could start setting the stones.

Baron Frederick was generous to assist me with polishing the coronet when the bezels were set. I do not have much experience with ferrous metals, and I was uncertain if my fine metal polishing equipment would be appropriate. He brought armor polishing equipment and a multi-tool to an event and showed me his process. I am very grateful for his help.

Coronation Tunic for King Hrodir III: Material Culture 31: A&S50 Challenge

Coronation Tunic for King Hrodir III: Material Culture 31: A&S50 Challenge
Orchestrated by Sayyeda al-Kaslaania
Completed by House Wortham and friends
Julia May

King Hrodir III and Queen Anne II of Northshield

In preparation for his Coronation, when Hrodir was asked what clothing inspired him, he pointed to the Coronation tunic of King Roger II of Sicily.
Blue Tunicella (Dalmatica). Palermo, 2nd quarter of the 12th century. Blue and red velvet, gold embroidery, gold appliqués with cloisonné enamel and filligree, pearls; l. 141,5 cm, 343 cm wide at hem. Vienna, Kunsthistorisches Museum http://www.khm.at/Archiv/Ausstellungen/nobiles/en/02/main.html
I enlisted the help of Baroness Deja, Mistress Ainsleigh, Mistress Gunnora, and Lady Niamh to determine the best resources for copying the adornment. We quickly determined how to do it, and that it would take hundreds of hours more than we had.

Instead, we looked to our stashes of fabric to see what would suit a King, and consulted the Queen's Royal Clothier, Mistress Cassandra, on the colors she was choosing for Queen Anne.

We settled on the silk brocade as primary ornamentation which would be used for both, and selected colors to coordinate. The black is a velvet brocade provided by Baroness Deja. The tan silk-wool twill (bottom of the picture) was in my collection.

I used my favorite tunic pattern (opens a .pdf) to make the garment. This pattern is great for prosperous men because the center body panel is narrower than the shoulder width. The shoulders don't slump down arms with the pattern, allowing a neater fit and great ease of movement. The pattern was used throughout Europe and the Middle East in the Middle Ages.

While the Honorable Lady Lyneya was tablet weaving the alpaca/silk trim for the neck line, I started making the tunic. Functioning by rote, I made the facing wrong. Thankfully I had enough fabric that I could make a new one!

The original tunic has an offset neck opening.

Meanwhile, many artisans started working on adding pearls to the brocade pieces. We finished each section of brocade individually, then appliqued the final pieces to the garment. This allowed several people to be working on the pearling at their own homes all at the same time.

Mistress Gunnora and Lady Niamh worked out the design for the cuffs. Baroness Ellen and I worked out the design for the sleeves. Mistress Cassandra provided the enameled "coins" in the sleeves.


Together, dozens of hours were put into this garment. Baroness Ellen, Baroness Deja, Lady Niamh, Dame Siobhan, Dame Marwen, Dame Medb, Baroness Khadijah, Baroness Amalia, Baroness Ekaterina, Lady Ulricka, Lord Oswald, Sayyeda Samia, and others all laid pearls and jet beads in little rows for hours. We created garb fit for a King.

Prince Hrodir III, claiming his right to the throne of Northshield

06 July 2015

Nordskogen 40th Anniversary Twelfth Night Site Tokens: Material Culture 28: A&S50 Challenge

Nordskogen 40th Anniversary Twelfth Night Site Tokens: Sterling silver rings in a period New Years style
Material Culture 28: A&S50 Challenge
Created by the Barony of Nordskogen
Julia May

33 dozen rings, sorted by size. A mallet and an mandrel are available for minor resizing.


Dame Siobhan stewarded the Twelfth Night celebration with heralded the 40th Anniversary of the Barony of Nordskogen. She put out a call for volunteers to design a memorable site token for the event with a budget of $1,200. Baroness Samia al-Kaslaania, the Honorable Lady Niamh ingen Dhomnail, and Lady Lleucu verch Gwilim submitted the selected bid.

Silver finger ring. 15th century. Winchester Museum Collection Object number: WINCM:AY 204. Adorned with foliate and reads "en bon an". They were given as New Years gifts in the 14th and 15th centuries.
More examples of this kind of ring can be found on our Pinterest page: https://www.pinterest.com/jm0358/en-bon-an/


For ours, Lady Kolfinna Hrafnkelsdottir was the calligrapher, and Lady Lleucu was the designer. We utilized Rolling Mill Resource to laser engrave paper plates.We then used the paper plates to make an impression on  sterling silver sheets.

Testing the pattern and pressure on copper first.
The plates were annealed and cut apart into strips. The edges were butted together, and three-four people began soldering the butt-edges together. The rings went into the pickle (chemical cleaner to remove flux residue). Two people used mandrels and mallets to make the rings round.Several people cleaned up the rough edges, then the rings were bound together by size and put in a tumbler to polish. Finally, Max Black was added to darken the lettering, they were stamped with "925", and the rings were given a final polish.

From right to left: 1. stamped and annealed ring strip 2. ring strip folded for soldering. 3. ring just out of the pickle 4. ring being polished 5. finished ring with letters darkened. In the background is a charcoal block, used to reflect heat back to the object being soldered.
 

1. Soldering the joints: the rings are covered with flux and laying on a charcoal block. 2. Out of the pickle: the rings are shaped so they're easier to solder, and now need to be rounded. 3. Solder joint. 4. Rings cut unevenly need to be filed smooth.


Volunteers spent dozens of hours working on the rings. 

33 dozen rings doesn't look that *that* many. 
But it does take a lot of volunteers to make 408 sterling silver rings for an event. With the support of Baron Edward and Baroness Deja, territorial Baron and Baroness of Nordskogen, and Dame Siobhan, the event steward, over 35 people contributed time, materials, love, and effort. 
Lord Bastien and Lady Coquette; Master Cadwallon and Baroness Amalia; Lord Wulfstanus and goodwoman Renee; Lord Bazyli and Lady Helena; Lady Nezzetta; Lady Lleucu; Baron Thomas and Baroness Angelina; Lady Jenne; Lord DelNefre; Mistress Angeli; Lord Geirfold; Duchess Petranella; Baroness Jutta; Lady Ulricka; Lord Marcus and Lady Kate; Lady Kolfinna; Lady Ysabel; Lord Finn and Lady Cynthia; Lord Byron; Honorable Lady Una; goodwoman Kathy Unasister; Lady Niamh; Baron Fredrick and Lady Gwenllyn; Lord Oswald and Baroness Samia.